There are apple activities that look cute on a bulletin board, and then there are apple activities the children continue talking about after the theme is over.
My favorite starts with putting whole apples in the freezer.
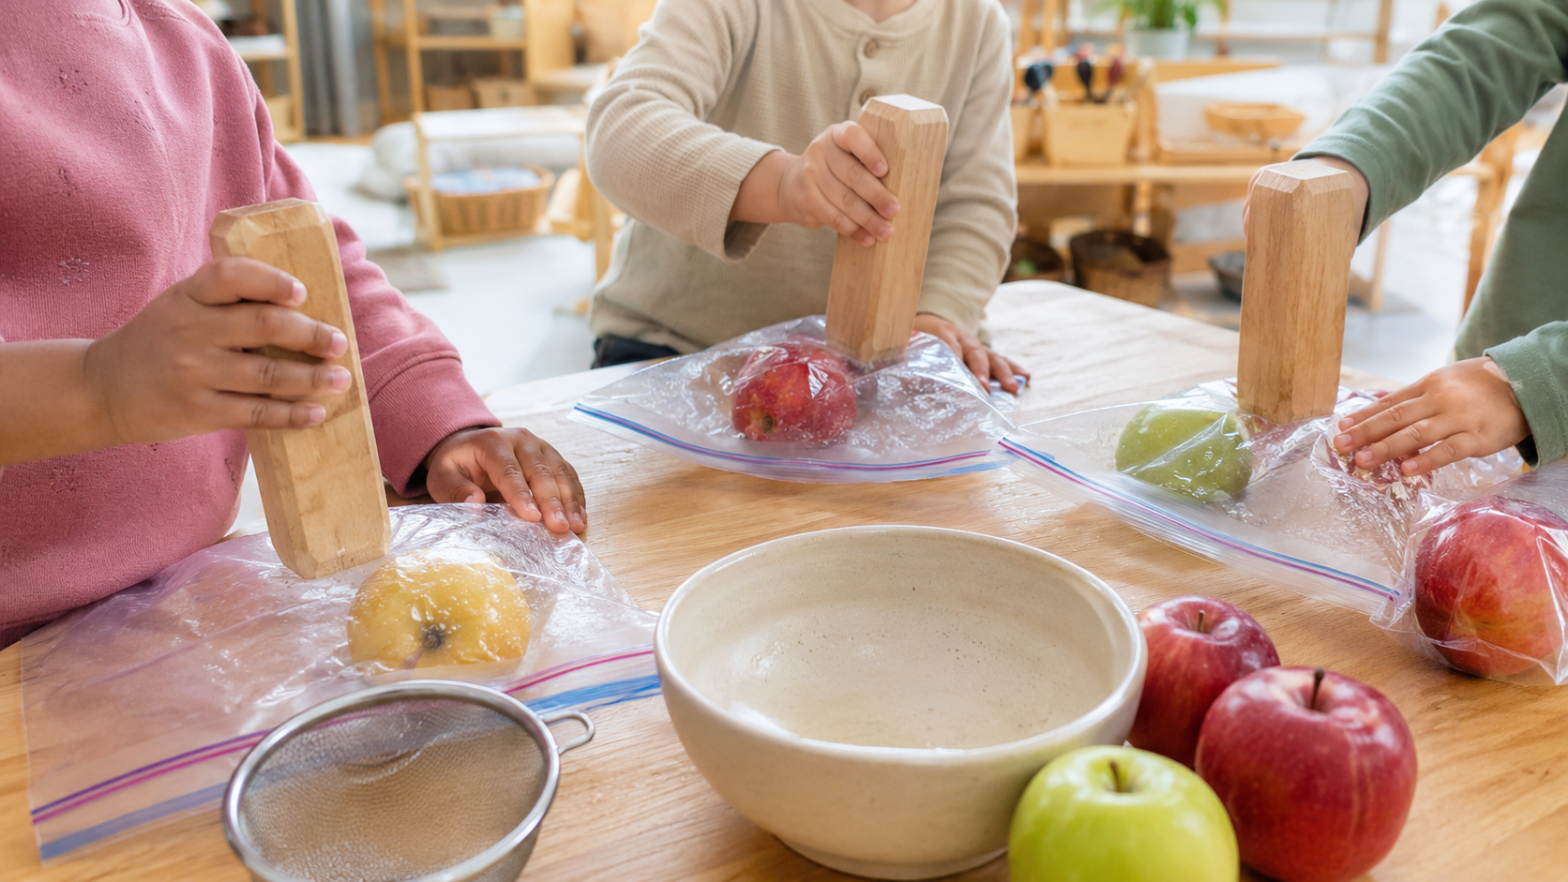
I know that sounds a little strange, but stay with me. After the apples have frozen completely, I let them thaw just enough to soften slightly. Each child gets a sealed freezer bag with an apple inside and uses a wooden block to pound and smash it. Then we strain the mashed apple, filter the juice and taste what we made.
The children are doing far more than making a drink. They are observing how freezing changes a real object, experimenting with force, separating solids from liquids and participating in every step of the process. It is messy, loud and always one of the best parts of our apple theme.
Below are the apple activities I would use to build an engaging preschool theme around that experience—including circle time, science, tasting, art and dramatic play.
Make Apple Juice by Smashing Frozen Apples
This takes a little preparation because the apples need to freeze completely. Put them in the freezer at least a day before you plan to use them.
What You Need
- Whole apples
- Freezer
- Heavy-duty zip-top freezer bags
- Wooden classroom blocks
- Large bowl
- Fine-mesh strainer, cheesecloth or another food-safe filter
- Small cups for tasting, if permitted by your program
How We Make the Juice
- Wash the apples thoroughly and freeze them whole.
- Remove the apples from the freezer and allow them to thaw slightly. They should still be very cold but not rock-hard when the children begin pounding.
- Place one apple inside each child’s sealed freezer bag. Double-bagging can help contain leaks.
- Set the bags on a sturdy table or tray and let the children pound the apples with wooden blocks.
- When the apples are thoroughly mashed, an adult opens the bags and transfers the contents to a strainer positioned over a bowl.
- Press and filter the mixture to collect the juice.
- Observe the pulp, peel and liquid before tasting the juice, if your program permits it.
I do not add sugar. The juice has always been naturally sweet enough on its own.
Why Does Freezing the Apple Work?
Apples contain water inside their cells. When that water freezes, it expands and forms ice crystals that damage the cell walls. This is why frozen fruit becomes softer after it thaws. In our experiment, that softer texture makes the apple much easier for the children to smash and helps it release its juice.
The freezing does not create additional sugar. The sweetness is already naturally present in the apple—we are simply making the juice easier to extract. The University of Minnesota Extension explains how ice crystals rupture the cell walls in frozen produce.
Food note: Follow your program’s food-preparation rules and obtain any required allergy or food permissions before offering a taste. Homemade juice is unpasteurized. If your program does not allow children to drink it, they can still complete the smashing, straining and observation portions of the experiment and compare the result with pasteurized apple juice.
Bring the Apple Theme Into Circle Time
Apple circle time does not need to mean asking young children to sit through a long lesson about apple facts. I would rather give them something to hold, notice, sing about or act out.
Start by passing around several real apples. Include different colors and sizes if possible. Ask what the children notice before supplying the vocabulary for them. They may comment on the color, stem, weight, texture or smell. Compare two apples in your hands and let the children decide which feels heavier or looks larger.
Movement can be worked into the theme by pretending to:
- Reach high and pick apples from a tree
- Carry a heavy basket through an orchard
- Carefully sort apples by color
- Wash and polish apples
- Stir an enormous pot of applesauce
- Roll like an apple that fell from a tree
These motions can become part of a song, a listening game or a quick transition before the next activity.
I also created a set of Apple-Themed Circle Time Interactive Songs and Games for teachers who want the interactive portion planned and ready to use.
Investigate the Parts and Life Cycle of an Apple
The juice experiment naturally leads into a closer investigation. Once children have smashed an apple, they want to know what happened to all its parts.
Cut open a separate apple and invite the children to look closely. Instead of immediately naming everything, begin with questions:
- What do you notice inside?
- Which parts feel hard or soft?
- Where are the seeds hiding?
- What do you think each part does?
- What might happen if we planted one of the seeds?
Then introduce useful vocabulary such as skin, flesh, core, seed, stem and leaf. Preschoolers are capable of learning real scientific words when those words are connected to something they can see and touch.
From there, explore how an apple begins as a seed, grows into a tree, produces blossoms and eventually develops into fruit. Children do not need to memorize every stage. The goal is to help them recognize that the apple in their hand came from a living plant and changed over time.
To continue that investigation at the science center, my Apple Life Cycle & Parts of an Apple Play Beyond Pasta Science Center lets children sequence the life cycle, sort the parts of an apple, and build with prepared pasta and beans.
For an independent or small-group follow-up, my All About Apples Boom Cards let children practice the parts and life cycle of an apple with audio instructions.
Try a Real Apple Taste Test
A taste test is one of the easiest ways to add comparison, descriptive vocabulary and early math to an apple theme.
Choose two or three varieties that look noticeably different. Before tasting them, let the children predict whether they will taste the same. Cut the apples into small pieces, keeping the varieties separated, and invite the children to describe each one.
Useful words might include:
- Sweet
- Tart
- Crisp
- Soft
- Juicy
- Crunchy
Record the children’s favorites on a simple class chart. This does not need to become an individual worksheet. Children can place a name card, photograph or small block in the column representing their favorite apple. Count the votes together and compare which column has more, fewer or the same.
Turn Dramatic Play Into an Apple Orchard
An apple orchard gives children an actual reason to use everything they have been learning. Rather than decorating the kitchen with apples and calling it finished, give the children jobs and a sequence of play.
Children can:
- Pick apples from a classroom tree
- Inspect apples for bruises or damage
- Sort them by color
- Fill customer shopping lists
- Pack apple orders
- Weigh baskets
- Sell apples at an orchard stand
- Make pretend cider, pies or applesauce
Add baskets, reusable bags, a scale, a cash register and red, green and yellow pretend apples. Apples can be made from pom-poms, ball-pit balls or crumpled paper if you do not already own play food.
The important part is not making the center look like a perfect orchard. It is giving children enough roles, materials and problems to keep the play going. A picker needs something to collect. A sorter needs categories. A packer needs an order to fill. A customer needs a reason to visit.
Use Apples as an Art Tool—Without Making Identical Crafts
Apple printing can be open-ended when children are not expected to copy a teacher-made example.
Cut apples in different directions so children can examine the shapes inside. Offer large paper and a few fall-colored paints, then let them decide how to use the apples. Some children will stamp carefully. Others will slide the apple through the paint, mix colors, make long trails or cover the paper completely.
The apple is the art tool—not a template for twenty identical finished products.
This is also a useful opportunity to compare a fresh apple with one that has been left exposed to air. Ask the children what they notice as the cut surface begins to brown. Their observations matter more than producing a polished final craft.
A Simple Plan for Apple Week
The activities do not all need to happen in one day. Spread them out and allow the children to revisit ideas throughout the week.
Monday: Introduce real apples at circle time. Compare their colors, sizes, textures and weights. Open the apple-orchard dramatic-play center.
Tuesday: Conduct the apple taste test and create a class graph of the results.
Wednesday: Smash the frozen apples, strain the mixture and investigate how the texture changed.
Thursday: Cut open an apple to examine its parts. Introduce the apple life cycle and use the Boom Cards as a small-group or independent follow-up.
Friday: Revisit the children’s favorite songs, movements and orchard roles. Ask what they learned and what they still wonder about apples.
The dramatic-play area can remain open throughout the week so the children have time to expand their ideas instead of starting over with a completely new center every day.
More Fall Preschool Ideas
If you are planning beyond apple week, you can also see the fall activities I have used in my own preschool classroom, including dramatic play, outdoor exploration and pumpkin-patch ideas.
For another hands-on fall science activity, read my pumpkin investigation for preschool.
For more play-based preschool ideas, classroom activities and new resources, join the learnplayrepeat email list.
Teaching Adam and Eve during apple week? My Adam and Eve Preschool Activities unit pairs five Garden of Eden invitations with five apple-and-fall investigations, including the frozen-apple smash used here.
To continue the theme in pretend play, the Apple Orchard Dramatic Play Center includes setup inspiration, signs, menus, order cards, and child-led orchard roles.


2 thoughts on “Apple Activities for Preschool: Make Apple Juice, Explore Science & Play”